
In just under 10 years, Instagram has grown to become one of the most popular social media platforms on the internet. Used not only by the everyday person to share snaps of their lives but Instagram is also an important platform for marketers from all sorts of backgrounds.
From street photographers to food photographers, fashion icons to artisan candle makers, Instagram bosses over 1 billion users every month, with 500 million of those using Instagram’s ‘stories’ feature every day. The question you likely have, though, is, “Can I post to Instagram from my PC?” The answer is yes. However, it is not as easy as it sounds.
Can You Post To Instagram From A Desktop Computer?
The answer to this question us a resounding yes! When asking about how to post on Instagram from a desktop or from a laptop, there are multiple ways to do so, whether you are a Windows user, a Linux user or a Mac user, but some methods are easier than others!
Trying to post on Instagram from a PC has always been a bit of a pain. The app is not designed for use on a browser. That’s not to say that Instagram isn’t accessible from a browser, but if you’re looking for that familiar ‘+’ button to post your latest snap, you’ll be left wanting.
How To Post on Instagram
There are two main methods to upload to Instagram from a PC:
- Using a social media scheduling assistant – A third party (in most cases) tool is probably going to be the easiest method for any user, both professional or novice. These come in many different forms and many different pricing levels.
- Using the browser method - This involves going into the developer settings of your browser and forcing it to recognise that particular tab as a mobile. This, in turn, makes Instagram believe you’re on a mobile device and opens up the option to directly post on Instagram from your PC.
There is also a third method, which is similar to the browser manipulation method, and involves using an app or program to run a mobile environment emulator to launch the Instagram mobile app and use it as ‘normal.’
While this one can be a pain to set up, and the support documents for the emulators a very confusing to read, they do generally work very well and will emulate a mobile environment.
What do you need to post on Instagram from a PC?
Now that we know we have answered your question of “can you upload to Instagram from a PC?”, you need to know what you need to do. Posting from a PC is much like posting from a mobile in the methods used. First, you will need to decide how to post on Instagram from a laptop or PC using one of the three methods above. Each one has slightly different requirements, to begin with, but once you’ve got this figured out, you’ll need your photo, your caption, and your hashtags ready to go.
It’s obviously up to you to decide which photo -or other media- you’re going to post to your feed, and it’s worth noting that when using most of the methods mentioned above, there may not be the option to edit and crop your photos and videos. It’s best to have this done beforehand so that you have one less thing to worry about.
Posting on Instagram from a Mac
When questioning “how to upload photos to Instagram from mac.”, for the most part, the methods listed below work on both Windows and Mac environments. Many of the social media scheduling assistants listed below require no propriety software and will worth from any browser. A few, such as Buffer, do have their own extensions, which may work better in Chrome rather than Safari, but the Chrome browser is a cross-platform option. This means the social media assistants and the browser method will work in Windows, Mac, and even Linux!
A quick note about apps: Each of the scheduling assistants we’ve explored below has associated apps, and each one is available for both Android and Apple users.
Can I upload to Instagram from Windows?
All of the methods below work on Windows, but most are browser dependent rather than software dependent.
It’s a far assumption that most businesses will be using Windows-based environments. This is obviously not all businesses, but most are using Microsoft for their main IT. Social Media teams usually sit within the Marketing Department, meaning they are not always seen as ‘creatives.’ The creative team of a business, usually your photographers, graphic designers, video editors, etc, will generally be using Mac’s, but for the rest of the company, it’s usually Windows.
To answer the question, “can you post to Instagram from a desktop?” the answer is yes, and from whichever of the three main operating systems your desktop is running, such as Windows.
Do you need paid tools and what are the benefits?
The short answer to this one is ‘no.’ You don’t need paid tools to post to Instagram from a PC. However, you may find it much more helpful to use paid tools instead of the other two options, but this does leave you at the mercy of Instagram’s developers and their sometimes seemingly random updates.
A brief history of Instagram’s API
Most of the paid (and free) third-party tools listed below use the Instagram API to run actions. When Instagram first released their API to developers, it was very limited in what it could do. Even with the best will in the world, most professional social media scheduling tools required push notifications to a mobile device, relying on the human, in the end, to hit go.
This caused a lot of issues, especially in professional environments where it was commonplace to have “the Instagram phone” handed around to whichever staff member was on call, raising serious questions over security (especially with the new General Data Protection Act coming into force for the European Union).
In 2018, Instagram updated their API without warning, meaning that nearly all third party tools (and every Instagram Bot) were rendered useless overnight. This coincided with a huge update to Instagram’s owner Facebook’s API, all in a bid to combat the growing issues of spam and fake news and to boost engagement. Most users saw a dramatic drop off in engagement over the weeks that followed while everyone got used to the new system, and the bugs were ironed out.
While the story of Instagram’s API background may turn some people off of using third-party tools, it’s worth noting that there has been a huge growth in the third-party social media scheduling client sector.
Many of these apps come with fantastic options for analytics collections and reporting on statistics. If that’s something you’re into, then using a scheduling tool could be an excellent option for you.
Be warned, though, as scheduling tools are only suitable for those who have changed their accounts to be business or creator accounts.
Are free options worth the fuss?
The free methods for posting to Instagram from a desktop are numerous, and some are easy to use, but some require a little setting up before things can run smoothly.
There are definite bonuses to using free tools (including the free accounts on paid tools), but there are some serious drawbacks too. For an idea of whether you should use these, here is a list of general pros and cons for and against using the free options before we dive into what those options are.
Pros:
- They’re free!
- Once set up, most options are easy to use
- Many options use the Instagram app - just like posting from your mobile device
- Most aren’t reliant on third-party tools who are, in turn, reliant on Instagram API updates
- You can test many options to find the right fit before settling
Cons:
- Can be fiddly to set up
- Some options still require a third-party option
- Some options are notoriously flaky
- Options are likely to break at any given point
Free Option One: Change Your Browser Settings
This is a bit of a hack method to how to post on Instagram from your laptop, but it is reliable, and the huge benefit is that you will be using the Instagram mobile environment - the environment Instagram was built for.
An added bonus is that this option does not require your account to be either a business or creator account!
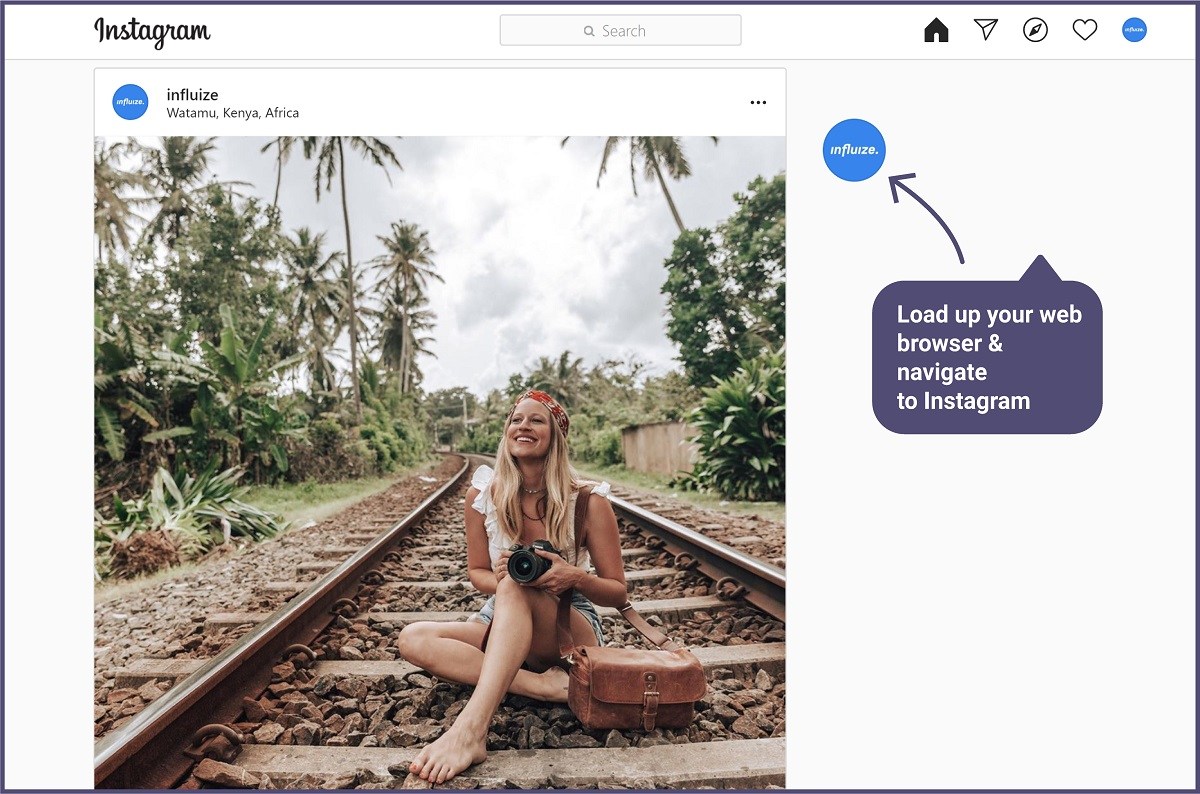
Step 1:
Load up your web browser (we’ll be using Chrome for this example, but there are similar options in Safari, Firefox, and Edge) and head on over to Instagram.com.
Step 2:
You’ll need to bring up the inspect element option. For Chrome, it’s very simple to right click anywhere on the screen and choose ‘Inspect.’
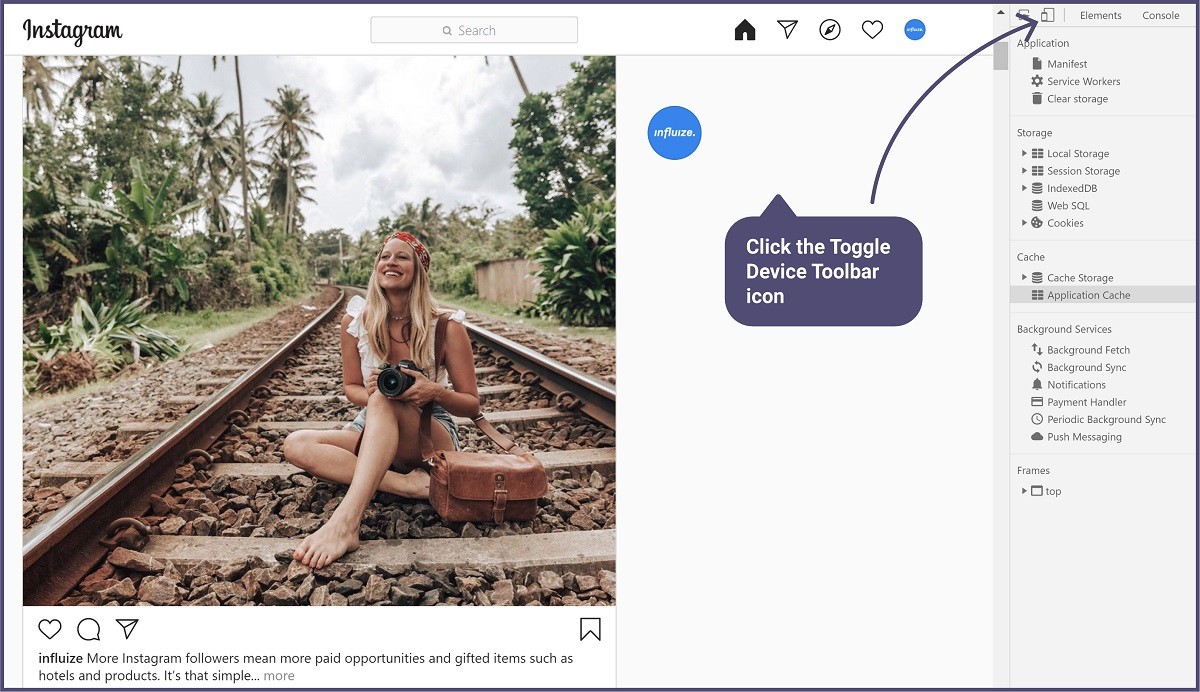
Step 3:
Locate the ‘Toggle Device Toolbar’ option. This is usually in the top left-hand corner and should look like a mobile device sitting on a tablet.
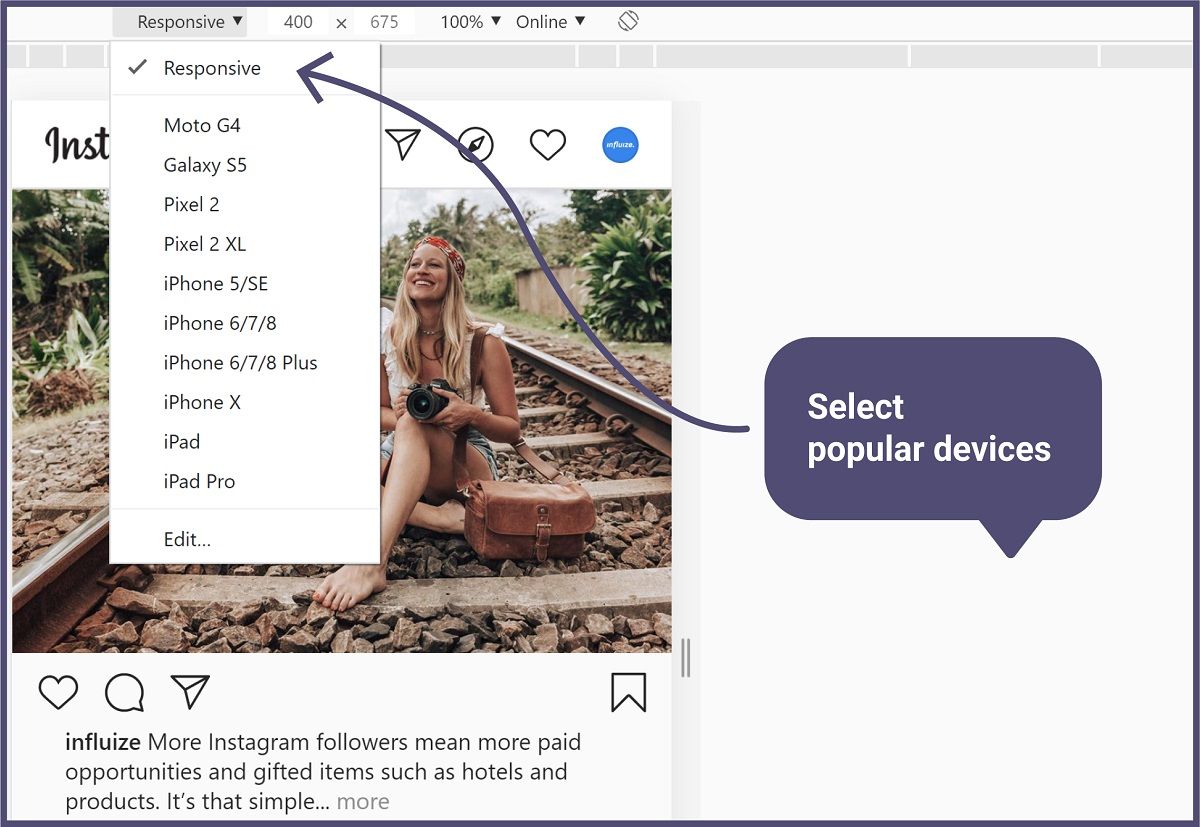
Step 4:
Select your device. On Chrome, you’ll have a little drop-down option with a few popular smartphones to choose from, such as the Galaxy S5, MotoG4, Pixel XL, and numerous Apple products, including iPads.
Once you’ve selected a device, you’ll see your screen transform into the mobile app, if this doesn’t happen straight away, hit refresh.
The little post icon should be at the bottom as usual. Hitting the little ‘+’ icon will bring up your file explorer, you will be able to crop your photo and add filters as well as tag your friends, the location, and write a catchy caption.
The only thing we did notice with this method is that you may not be able to add emojis. On our test, we were using the JoyPixels Emoji Keyboard extension for Chrome and, although we added them to our caption, they failed to show up once the post had gone out. This may be different for other emoji extensions or keyboards.
Using Vivaldi Browser
While this is the method used on the most popular browsers (Chrome, Edge, Firefox, and Safari), there is another browser that actually makes this process a lot easier.
The free Vivaldi Browser is a browser aimed at those who want more control over their browsing, from colours to environments. They are one of the only browsers to let you post to Instagram from your PC without changing settings.
Mobile Emulator Method
Another great free option concerning how to post to Instagram from a computer is to use a mobile emulator program to emulate a mobile environment.
There are a few different choices to go with here, BlueStack is probably the most popular of these apps, and, although this app allows you to post on Instagram from Windows and Mac, you’ll be emulating an Android environment rather than an Apple-based environment. There is no Linux support for this app yet.
Running an emulator like BlueStack is fairly simple, but it can be incredibly slow to use, which may frustrate most users.
It’s worth noting here that these three free methods rely on the native Instagram app (even the BlueStack method!), this means you won’t be at the mercy of any API changes and, theoretically, your method of updating should continue to work regardless.
The Social Media Scheduling Assistants
We all love a freebie, especially when it works really well, but there are definitely some benefits to using paid options, as well as some drawbacks to each.
Before we get into the specifics of each of the four options we’ve listed below, there are a few general things to note about using social media scheduling assistants.
- Not all assistants are created equal: Some on this list are focused purely on the scheduling element, and that’s all they do. While others use AI to make the process more automated, and others are full-on suites that can bundle in analytics and reporting into the mix as well as engagement.
- Scheduling assistants can break. A lot: Ask any social media professional what they hate about their job, and we can bet that the second thing that pops up (after the endless list of trolls, of course) would be when the tools break. They say a good workman never blames his tools, but in this case, a broken tool can cause havoc.
- Scheduling tools need to be monitored: Sure, they all say “schedule and forget,” but when a tool breaks, it can be a nightmare. There’s also the risk of human error in this one too. All tools on this list have a healthy dose of management required, sometimes at the micro-level!
- The API rules: As we discussed earlier, when Instagram (or any of the social networks) decides to ‘update’ their API, it can be an absolute nightmare for these tools to catch up. It’s getting much better, but it’s not uncommon for the tools to go down for a matter of hours (or days, or even weeks) after an unexpected ‘update.’
There are a myriad of scheduling assistants and tools on the market. Most offer a free (or ‘freemium’) option to get you started, and prices can vary from very reasonably priced to incredibly expensive.
Scheduling tools may also offer options or additional extras such as reporting, analytics, monitoring, listening, responding, and even basic photo editors.
Here are a few popular and not so popular options that we’ve tried:
Hootsuite (Paid, with free options)
Description: Hootsuite is the grandfather of social media scheduling assistants, being one of the oldest on the market. It has an excellent range of paid options, including reposts, analytics, the ability to have a number of different platforms plugged in, and social monitoring and listening.
Direct posting available? Yes.
Pros: Very popular option, updated frequently, most social managers have used it at some point in their career, excellent help team, ability to respond and do social listening.
Cons: Can be slow to update with new API changes, the interface is not at all user friendly, was the last to get direct to Instagram posting, very expensive compared to other tools.
Price Range: Free (basic account) £24 - £488+($29-$599+) per month.
Buffer Publish (Paid, with free options)
Description: Buffer was originally focused on just scheduling, there was no ability to reply or respond until quite recently. Being one of the first platforms to get direct to Instagram scheduling is a big bonus for Buffer, and their blog is a fantastic resource for social media managers.
Direct posting available? Yes.
Pros: Great user interface, very well designed, fast updates, intuitive, simple, and clean, a really good free offering, and excellent scalable price options for businesses, excellent and fast to respond help team.
Cons: Reliability has been quite flaky recently, they have a habit of depreciating useful tools without much warning, new integrations for replying and responding can be very pricey. There isn’t an Instagram option with the free account.
Price Range: Free for the basic account, with NO Instagram scheduling, but from £12 - £117+ ($15-$144+) per year for scheduling on Instagram.
Zoho (Paid, with free options)
Description: Zoho is a relatively unpopular option for most businesses, but their social media platform is really rather good. Zoho is primarily a business CRM that can handle mail, projects, sales, and many other tasks. Their social platform is part of their offering but works as a standalone option with the ability to schedule, post, and create great reports.
Direct posting available? Yes and No (not on creator accounts).
Pros: Great and intuitive layout, with a great selection of reports and the ability to add collaborators. It has an excellent pricing structure but also benefits with the free account.
Cons: Limited in the number of accounts on the free version, can get pricey as you scale up. No direct posting to Instagram.
Price Range: Free (basic account), £8- £267 (€10-€300) per month.
Facebook Creator Studio (100% Free)
Description: Facebook’s own proprietary scheduling tool is a relatively new one to the game. Facebook brought their own ‘Creator Studio’ to the world in 2018 but has remained fairly quiet about this fantastic resource. Instagram monitoring has been on the platform since it’s inception, but scheduling and direct posting only came out within the last year or two. Creator Studio is aimed towards video, but has the ability to schedule to both Facebook page and Instagram page accounts.
Direct posting available? Yes.
Pros: Facebook’s own studio should, theoretically, be updated at the same time as Facebook. No third party tools needed, 100% free for every user, Instagram, and Facebook page analytics, can post directly, can use the whole range of posting types for Facebook pages, something most tools cannot do.
Cons: The interface can be quite clunky if you manage more than one or two accounts and pages, there is no bulk scheduling option at all (all posts need to be scheduled one at a time, and this is really laborious), despite being a proprietary tool, it can be quite buggy at times.
Price Range: Absolutely free!
How to upload multiple photos to Instagram from PC?
Bulk upload is an option used by many social media managers and agencies to get content out and scheduled onto the platforms quickly.
For most agencies, working with many clients, community managers will write the social content in a spreadsheet and send it to the client for approval before scheduling this in whatever tool they are using. If the tool doesn’t have a bulk upload option (Facebook Creator Studio, we’re looking at you!), this can mean scheduling takes a long time as opposed to a relatively short amount of time when using a CSV file.
With most social scheduling tools, you might question how to upload photos to Instagram from a computer in bulk with such a system. However, there are no options to do so as of yet. Likewise, this means you can upload bulk stories, direct feed images, or IGTV. This is due to the very nature of Instagram being a photo first platform. Many agencies will still use a spreadsheet (or other approvals process) for the written content, but they will use another tool to view the images.
Posting to Instagram Stories from a PC
Instagram introduced stories back in August of 2016. They were one of the very first social media platforms to really invest in posts that disappear after 24h hours, following on from SnaPChat’s version a few years earlier.
Skip forward to 2020, and nearly every social media platform has the option for users to create disappearing posts. Even Twitter is considering adding this feature which they’re naming ‘Fleets’ in a bid to appease the privacy-conscious generation. The problem this leaves many people with, however, is how to view Instagram stories on the computer.
Posting to Instagram stories from a PC, Mac, laptop, or desktop is a little more tricky than using the app.
The browser method - You CAN post and view Instagram stories on the computer using the browser settings method, but the options here are limited. You won’t be able to crop your photo video (or zoom in and out), editing the text is very limited, and you’ll only have very limited sticker options (no gifs, location, or time-based options either).
The App Emulator Method - In theory, this one should work fairly well, it remains untested by us though, so we can’t say for certain.
Using a Scheduling Assistant - Most scheduling tools and assistants are now able to schedule Instagram stories. The limitation here is that you will only be able to schedule a finished piece of work.
This doesn’t have to be a big limitation, though, there are many excellent services that allow you to create Instagram story images and videos ready to post. Canva has offered this option for a while, and Buffer has its own lightweight story creator option that anyone can use for free, whether you are a Buffer user or not.
Facebook’s Creator Studio does not currently offer the option to schedule or post to Instagram stories from their tool. Even though you can post to your Facebook story from the desktop and cross-post to your Facebook story from the Instagram app for a computer, there is no way to post to Instagram stories from inside Facebook either.
How to upload video to Instagram from a PC?
While you might have the answers to “how can I post pictures on Instagram from my computer?” there might still be one question left unanswered: “how to post videos on Instagram on computer.” Using the methods above, it is possible to post on Instagram from a desktop quite easily, but uploading video can be a little more tricky.
Regular videos in the feed are relatively straightforward, but you won’t be able to upload to stories from the browser manipulation method, although you can post to stories using scheduling assistants like Facebook Creator Studio.
Back in June 2018, Instagram released IGTV, both a standalone app and a service within the Instagram app. The main differences between IGTV and Instagram Stories are both the length of the stories and the orientation.
While you’ve always been able to upload horizontal videos to Instagram Stories, it was always more designed towards vertical video, spawning a whole new craze for creators and a new rush on vertical video from the video stock platforms. IGTV welcomes both vertical and more traditional horizontal videos, with the time allowed per video file increasing from the standard 15 seconds per clip on stories to up to 15 minutes per clip on IGTV.
As it stands, at the moment, the only way to upload videos on Instagram from a PC or laptop is to use Facebook’s Creator Studio. If you’ve already connected your Instagram account to your Facebook Creator Studio account, this process is very easy:
Step 1:
Load up Facebook Creator Studio.
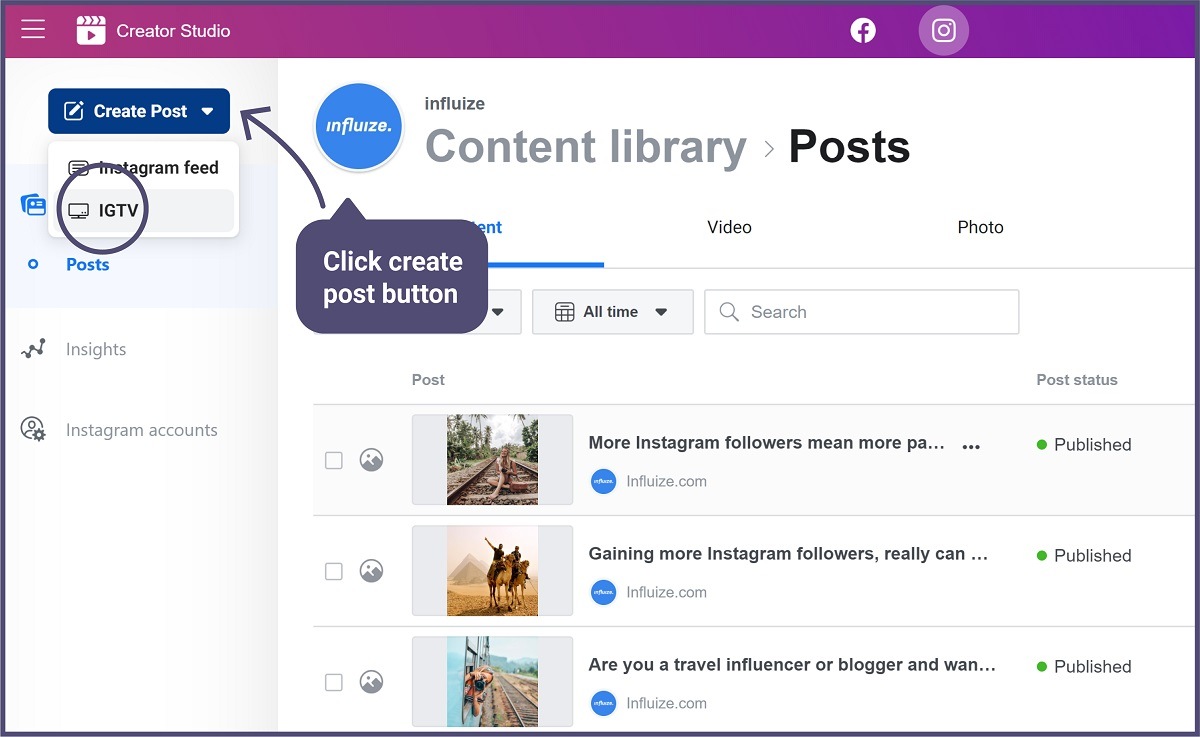
Step 2:
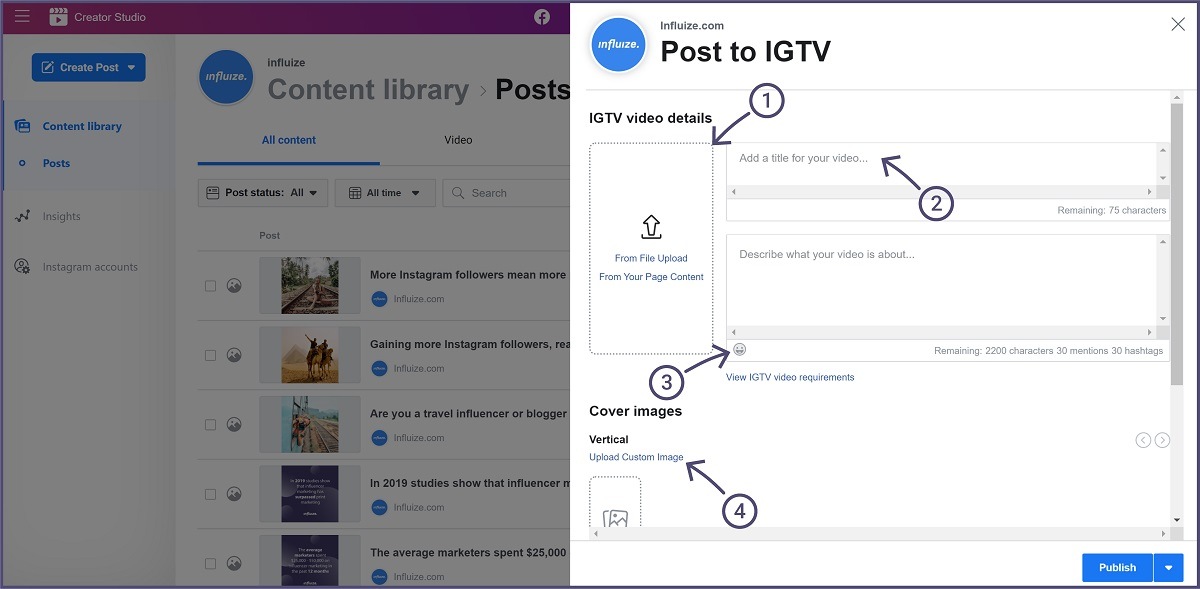
Navigate to the Instagram section and hit the big blue Create Post button in the top right corner. From here, select the IGTV option from the drop-down menu and select the account you want to post to if you have more than one.
Step 3:
Select the video you wish to upload, fill in the details in the boxes, and choose a (vertical only) cover image.
Step 4:
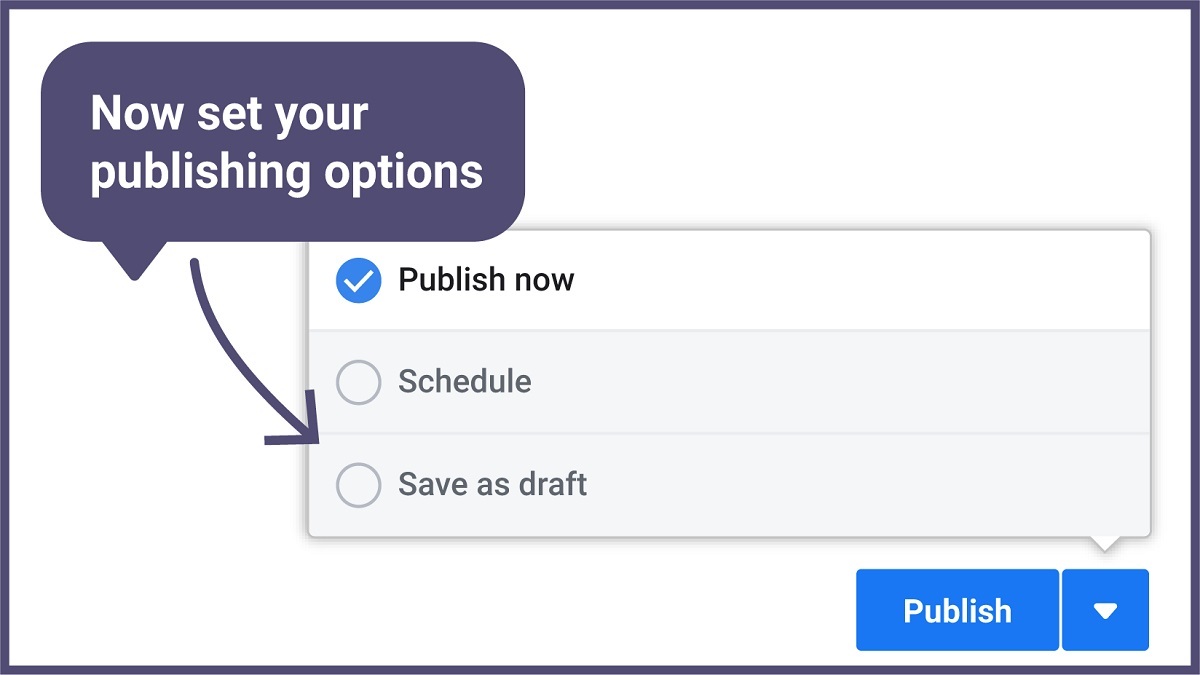
Publish or schedule. To schedule, hit the drop-down arrow next to the publish button; from here, you can decide to publish, save as draft or schedule. If you choose to schedule, you’ll be given a date and time box.
If you are considering “can I go live on Instagram on my computer,” you will be pleased to hear this is possible too. Uploading live video content is easy.
Step 1:
Use a third-party system, such as Loola.tv and sign in with a Google account.
Step 2:
Connect your camera and mic to your computer.
Step 3:
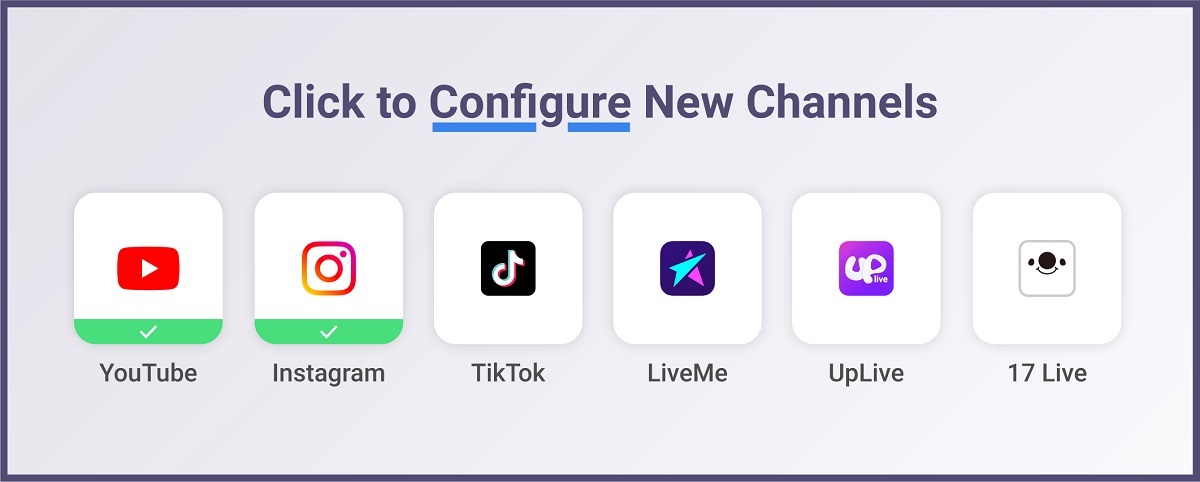
Configure your social media accounts.
Step 4:
Choose the social media account you want that you want to live stream from. In this case, it is Instagram.
Step 5:
Click “Go Live.” This can be found in the upper right-hand corner of the page.
Conclusion
Hopefully, by now you’ve got some good ideas on how to upload photos to Instagram from a computer, and you’ve had a good insight into using the Instagram app on your computer. You can upload to Instagram from Windows or Mac, and even Linux using the browser method, and Windows and Mac using an app like BlueStacks.
It is perfectly possible to post to Instagram from a PC, but there are many methods to choose from, so it’s worth spending some time trying out each method and deciding what is right for you.
Once you know how to upload photos to Instagram from a PC, as well as videos, you can start making the most of it. Be prepared for updates that could affect your abilities to do so effectively, and considered the pros and cons of the tools that will enable you to post on Instagram from a PC. It might be a matter of trial and error to find the right tool for you, but in the long run, this could change the game for you regarding updating your social media profile.